


Building a Reverse Image Search Engine Using Qdrant Vector Search
Building your very own local Image search engine using Qdrant VectorDB and LLMs


I know… It’s cool, right? It’s like you have cracked Google!
In this article, you are going to build your very own personalized reverse image search engine using an open-source image-embedding model and Qdrant vector database, which has been gaining serious attention in the AI community lately.
Buckle up, folks! Let’s begin.
Each of us must have used Google Images at least once, either to search for similar images, identify the source, or find higher resolution versions by uploading images instead of using text queries.
But, do you ever question how Google Images is able to comprehend the given image and bring together all similar images present on the Internet?
Or, how does it know that all these images are related?
Or, how could it achieve that accuracy in projecting the matched images?
Yeah, I was there too. But not after what I discovered.
Introduction
As the world around us becomes increasingly visual, the demand for efficient ways to search and access information through images continues to grow rapidly. Currently trending text-based search methods have their limitations when it comes to accurately describing complex scenes or objects (imagine describing a beautiful scene in front of you – it’s pretty difficult).
That’s why Reverse Image Search, a groundbreaking technology like Google Images, can now allow users to upload or drop an image into a search engine to locate similar or identical photos – and represents a major leap forward in the field of visual search.
Harnessing the power of AI takes efficiency and convenience to a whole new level. By integrating AI capabilities with Reverse Image Search Engine, you can elevate your search experience further. Imagine having the ability to build your own personalized search engine right on your laptop, something that can be your own personalized Google.

This doesn’t just streamline tasks but also empowers users with a tailored and efficient image search solution. And I could achieve this with the help of Qdrant Vector DB and Open-AI’s open-source model.
Let’s sail through the creation of this awesome Reverse Image Search Engine using OpenAI’s latest and greatest open-sourced CLIP model coupled with the sheer might of Qdrant’s Vector Database.
This process is divided into the following sections:
Environment setup.
Data-Preprocessing & Populating the Qdrant Vector Database.
Gradio Interface setup.
Testing Reverse Image Search.
Setting the stage!
Initiating the setup for this project begins with fetching the Docker container image and, subsequently, running it on your local Docker daemon. (Ensure you launch the Docker application beforehand.)
- Pull the Qdrant client container from the Docker Hub. Then run the container using the following command, which will host the application at
localhost:6333.
docker pull qdrant/qdrant
docker run -p 6333:6333 -p 6334:6334 \
    -v $(pwd)/qdrant_storage:/qdrant/storage:z \
    qdrant/qdrant
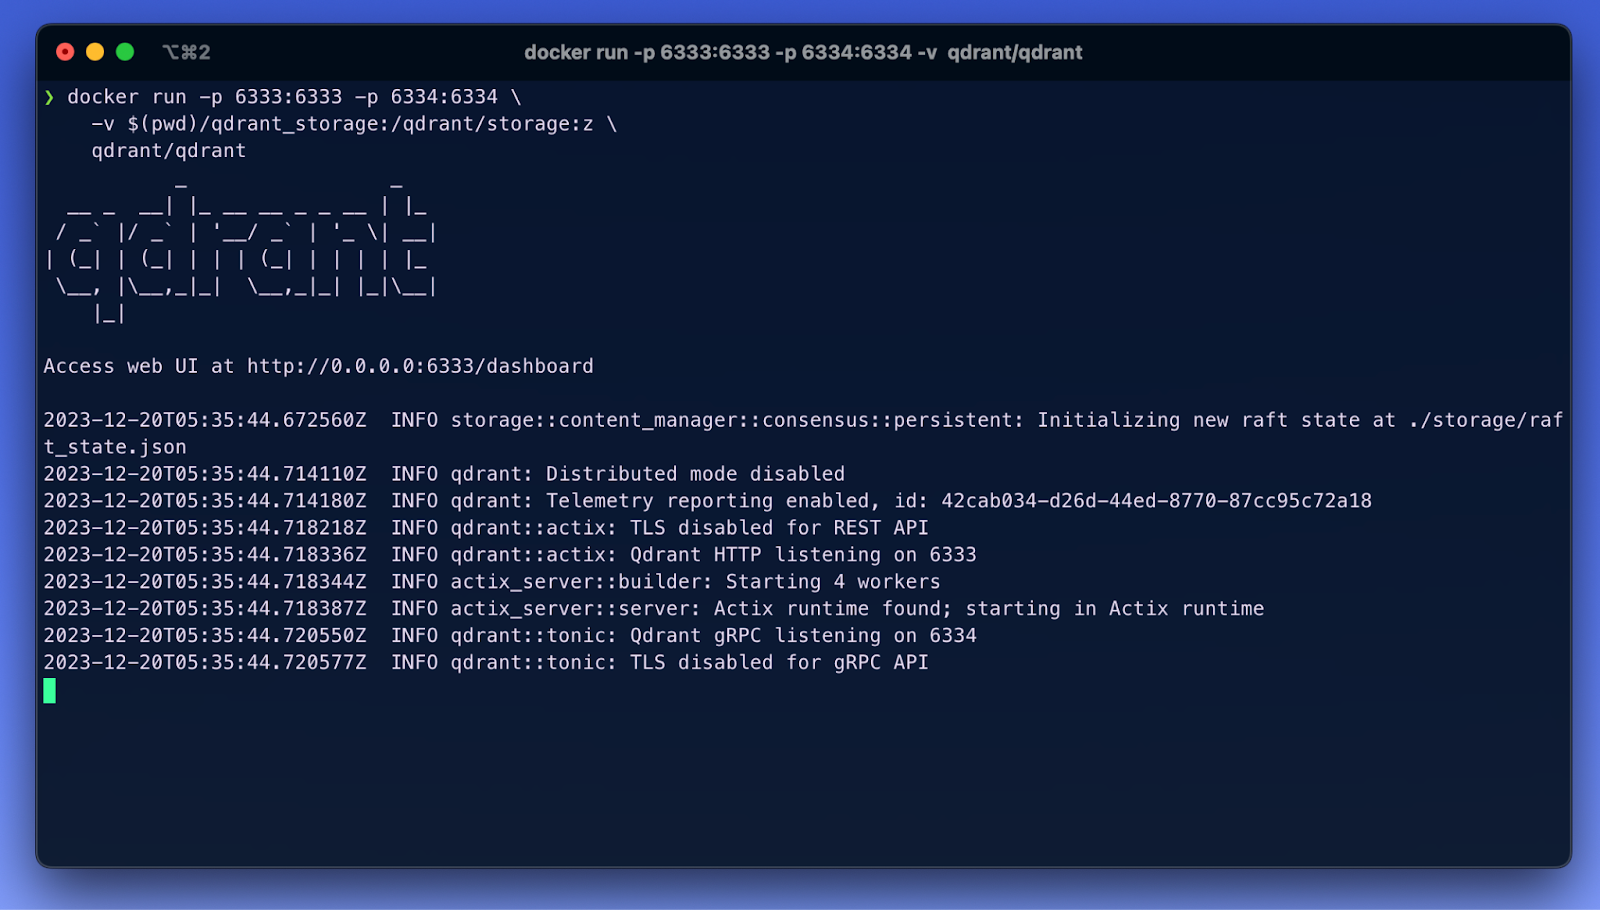
NOTE: If you are running on Windows, kindly replace $(pwd) with your local path.
Next comes the most important step of all: ‘Use an Environment’. You need to have an independent environment when performing experiments. Let's create a Python environment (I used Anaconda) and install the basic dependencies necessary to run the AI model from the requirements.txt file provided in the Git-Gist.
  conda create -n qdrant -y
  pip install -r requirements.txt #file given in Git-gist
Everything is set, let’s kick off the show!!!
Data Pre-Processing and Populating the Vector Database
For this project I’ve used the ‘alessiocorrado99/animals10’ dataset, which is a collection of 10 different animal images from Kaggle.
First let's install the Kaggle package; for that open Jupyter Notebook in vscode and install the package using pip install kaggle
Obtain your Kaggle API key: You can generate it on Kaggle by going to your account settings and under the ‘API’ section, click on ‘Create New API Token’. This will download a file named ‘kaggle.json’ which holds the credentials required.
Move the downloaded ‘kaggle.json’ file to your project directory.
Open the terminal and run the following command to download the dataset above mentioned:
kaggle datasets download -d alessiocorrado99/animals10After downloading, you may need to unzip or extract the contents of the downloaded file for further processing.
In my previous article, I have used OpenAI’s CLIP model, specifically ‘openai/clip-vit-base-patch32’. This model is tailored for zero-shot image classification and yields a (1,512)-dimensional feature embedding for each image. And it doesn’t stop there. Being pre-trained on images and their corresponding captions, it aligns both textual and visual contexts within the same embedding tensor space. This implies that whether you input text or an image, you will receive a (1,512)-dimensional embedding tensor. So, I am using the same model here to generate my image embeddings.
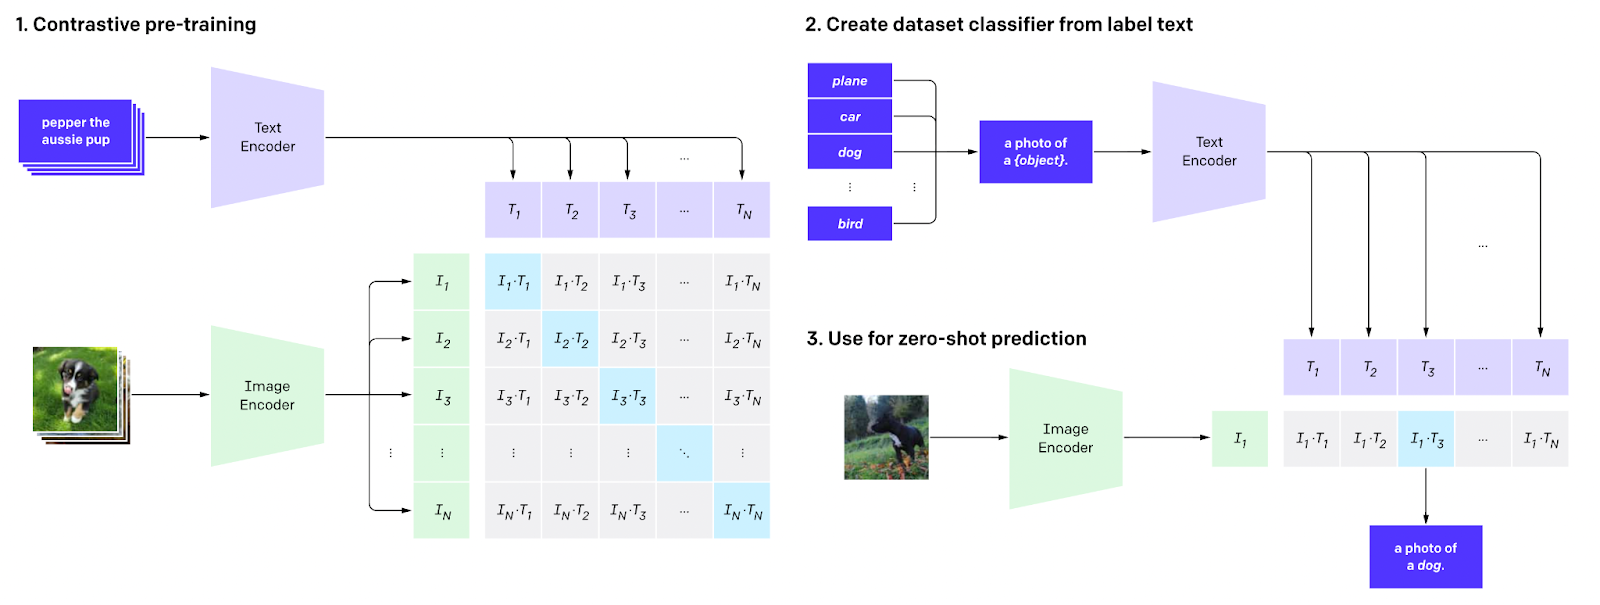
The beauty of the CLIP model lies in its ability to map both image and text data into the same embedding space, as shown in the image above.
When we input a query in the form of text, we use a tokenizer to break it down into token_ids. Afterward, we utilize the get_text_features method from the model class to create an embeddings tensor, resulting in a feature tensor with dimensions (1, 512). On the other hand, if the input query is an image, we employ the processor to prepare and convert the image into a format suitable for the model. Then, by using the get_image_features method from the model class, we generate an image embedding tensor with dimensions (1, 512).
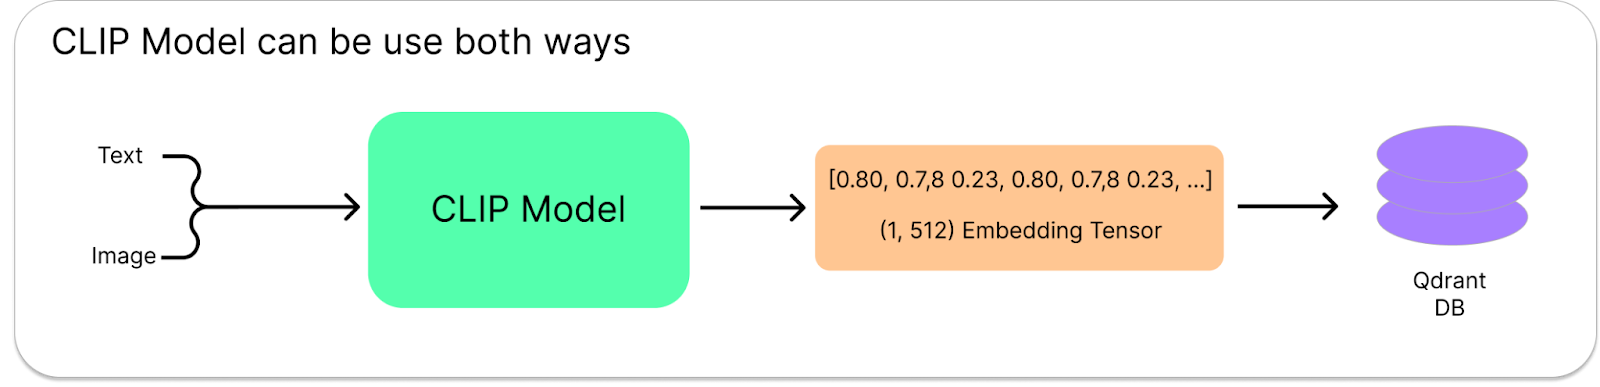
Here we have an image processor to prepare images before feeding them to the model. This processor performs cosmetic changes to the data so that it is consumable by the model. Once the model is loaded, you'll have to create a Qdrant client that connects to the local Docker container running the Qdrant Vector DB. The vector size is set to 512 aligning with the output embedding feature tensor shape from the model, which is (1, 512).
Fill the VectorDB by processing each image in the dataset in a loop, extracting their features using the CLIP model that maps the features to a fixed dimensional embedding space, and then upload the resulting embeddings to the 'animals_img_db' data collection in Qdrant's VectorDB.
client = QdrantClient("localhost", port=6333)
print("[INFO] Client created...")
root_dir = "new_dataset"
for subdir, dirs, files in os.walk(root_dir):
   for file in files:
       #look only for image files with jpeg extension
       if  file.endswith(".jpeg"):
           image_path = os.path.join(subdir, file)
           try:
               image = Image.open(image_path)
               image_dataset.append(image)
           except Exception as e:
               print(f"Error loading image {image_path}: {e}")

print("[INFO] Loading the model...")
model_name = "openai/clip-vit-base-patch32"
tokenizer = AutoTokenizer.from_pretrained(model_name)
processor = AutoProcessor.from_pretrained(model_name)
model = AutoModelForZeroShotImageClassification.from_pretrained(model_name)

print("[INFO] Creating qdrant data collection...")
client.create_collection(
   collection_name="animals_img_db",
   vectors_config=models.VectorParams(size=512, distance=models.Distance.COSINE),
)

print("[INFO] Creating a data collection...")
records = []
for idx, sample in tqdm(enumerate(image_dataset), total=len(image_dataset)):
   processed_img = processor(text=None, images = sample, return_tensors="pt")['pixel_values']
   img_embds = model.get_image_features(processed_img).detach().numpy().tolist()[0]
   img_px = list(sample.getdata())
   img_size = sample.size
   records.append(models.Record(id=idx, vector=img_embds, payload={"pixel_lst":img_px, "img_size": img_size}))

for i in range(30,len(records), 30):
   print(f"finished {i}")
   client.upload_records(
       collection_name="animals_img_db",
       records=records[i-30:i],
   )
NOTE: if you notice, I'm not just preserving the image embeddings; I'm also storing the pixel values and image size in the vector payload. This information will be handy later for reconstructing the image to display on the Gradio app. To gain a clearer understanding of the experiment's flow, refer to the 'Data Flow' illustration provided in the subsequent section.
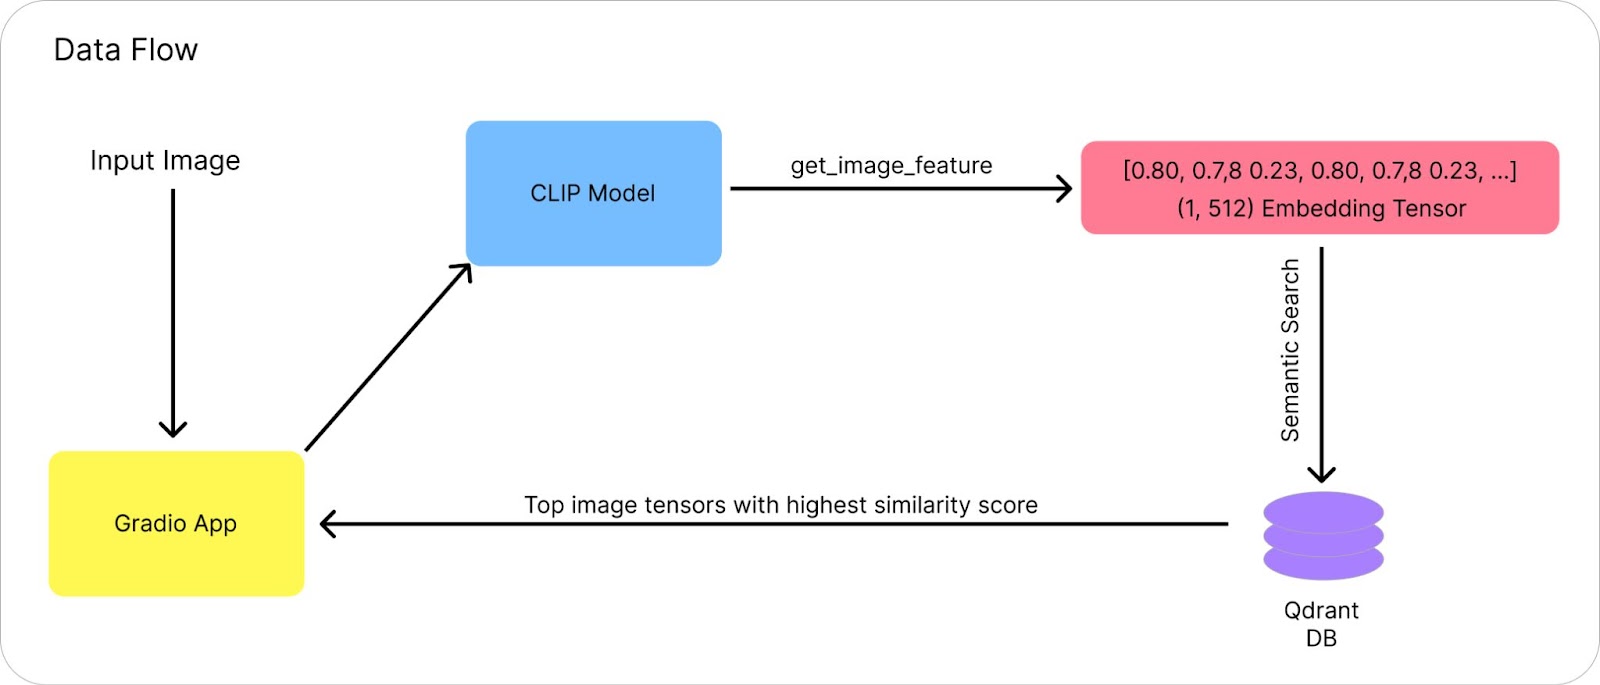
Now that our data is prepared and comfortably stored in Qdrant's VectorDB, let's develop an application to interact with it and retrieve information using Qdrant's Semantic Search functionality.
Gradio Interface Setup
I’m using Gradio to quickly create a functional app with an appealing UI. You may ask, why? Well, because it provides a readymade UI bundle that's easy to set up and perfect for swift demonstrations and, come on, it’s awesome. Coding through it is quite straightforward to be honest.
To put in simple terms, our application will take an image as input from the user. We'll then vectorize the image by generating image embeddings using the 'get_image_features' method from the CLIP-model class.
client = QdrantClient("localhost", port=6333)
print("[INFO] Client created...")
#loading the model
print("[INFO] Loading the model...")
model_name = "openai/clip-vit-base-patch32"
tokenizer = AutoTokenizer.from_pretrained(model_name)
processor = AutoProcessor.from_pretrained(model_name)
model = AutoModelForZeroShotImageClassification.from_pretrained(model_name)
# Gradio Interface
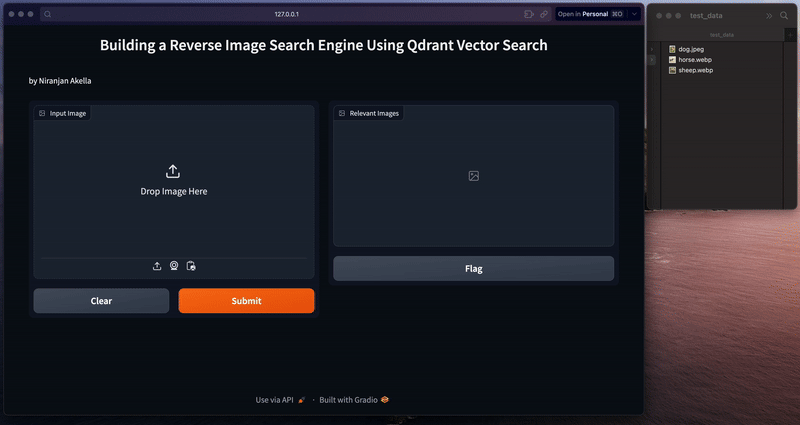
iface = gr.Interface(
title="Building a Reverse Image Search Engine Using Qdrant Vector Search",
description="by Niranjan Akella",
fn=process_text,
inputs=gr.Image(label="Input Image"),
outputs=gr.Gallery(label="Relevant Images"),
)
iface.launch()
Finally, we'll use the vectorized image as a query to perform semantic search over the ‘animals_img_db' collection present in Qdrant VectorDB and retrieve top 5 matches utilizing the semantic search method from Qdrant's client class.
def process_text(image):
   processed_img = processor(text=None, images = image, return_tensors="pt")['pixel_values']
   img_embeddings = model.get_image_features(processed_img).detach().numpy().tolist()[0]
   hits = client.search(
       collection_name="animals_img_db",
       query_vector=img_embeddings,
       limit=5,
   )
   images = []
   for hit in hits:
       img_size = tuple(hit.payload['img_size'])
       pixel_lst = hit.payload['pixel_lst']

       # Create an image from pixel data
       new_image = Image.new("RGB", img_size)
       new_image.putdata(list(map(lambda x: tuple(x), pixel_lst)))
       images.append(new_image)
   return images
NOTE: The complete code is shared at the end of this post along with the link to Git-gist.
You can directly run the Gradio application from the terminal using the Python runtime python3 app.py.
Conclusion

In a nutshell, I successfully integrated the capabilities of OpenAI's CLIP model for generating image embeddings with Qdrant's semantic search feature through its vector database, which facilitates efficient reverse image searches that replicate a widely used Google Images function (which we all love, by the way). I showcased the extrordinariness (yup, I made up that word) of artificial intelligence in conjunction with an innovative vector database such as Qdrant. I presented a practical demonstration using Gradio, an intuitive application allowing users to perform reverse image searches by submitting query images effortlessly.
This article is a comprehensive tutorial, guiding you to construct your very own personalized Reverse Image Search Engine employing AI and Qdrant's VectorDB.